|
The Kit
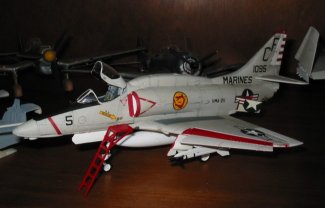
This kit is not the kit that is on the box in the photo 09486. The kit is actually Hasegawa A-4E/F kit PT21, but there is a story why this is.
|
Click on
images below to see larger images
|
|

|

|

|
Construction
This model was built OOB with the exception of the ejection seat witch was from True
Details. This kit was built originally as kit PT21 back in 2002. The kit was all completed apart from the canopy. This kit was the last kit that I had built from late 2002, as circumstances from 2002 to late 2004 put my model on stand still. 2005 the models came back out with three models still half constructed from back in 2002, and this
Syhawk. The problem with the Skyhawk was that when I had built it back in 2002 and had painted it in the colour of Gray FS16440 I lost most of the panel lines, the reason? The paint was too thick so rather than having a nice thin cote of paint on the model with crisp panel lines I had this grey Skyhawk with no panel lines the paint had completely filled in every panel line on the kit. So the Skyhawk sat on a shelf while I finish an F-16 and continued construction on my Phantom, three months past and I thought of chucking the Shyhawk in the bin “what’s the use it’s stuffed”, I then remembered an article on ARC in the Tools & Tips section with a secret weapon oven cleaner, So I raided the laundry cupboard and bingo oven cleaner. I set to work stripping the kit of landing gears and doors, weapons pylons, drop tanks, airbrakes, flaps, aggressor hook, lights, guns and ejection seat. With that done I sprayed the kit with oven cleaner covering every inch of the kit, Like I had said before the kit was basically completed in grey and white paint with decals, gloss clear, pastel and dull gloss, so it took a week of covering the kit with oven cleaner leaving it for 24 hours than attacking the kit with warm water and a toothbrush. After all that the kit was striped of every thing it was back to its moulded plastic colour thanks to ARC and the people that post there article etc Tools & Tips the kit was saved from the bin. Next step was to re scribe the panel lines and a wash in some soapy water, the Skyhawk was now ready to be repainted this time I made sure to thin the paint so it was almost like water.
Painting and finish
This kit was painted in grey FS16440 and white FS17875 and let me tell you with the paint thinned just right the panel lines came out nice and crisp. My next problem I faced was I had no decals, so I hit the web looking for decals but found that most of the decals on the market were for the A-4E what to do those available for the F I didn’t like to much and the ones I found that I did like I couldn’t get a hold off. I went down to my local hobby shop to have a look for a new kit when I found another Skyhawk the shop was having a sale so I though I’d buy the Shyhawk I wanted to make R.A.A.F skyhawk any way. With this I now had decals for the Shyhawk I had constructed. After the decals were applied I airbrushed gloss clear over the entire kit, once this was dry I went to work on the pastel wash for the panel lines witch I was very happy with the out come the finishing touches was applied with the dull cote and that is that. This A-4F Skyhawk is finished to represent VMA-211 “Wake Island Avengers” Iwakuni U.S.M.C Air Station 1975
|
Click on
images below to see larger images
|
|

|
|
Thanks
I’d like to thank all the guys that submit there articles to this site I have found so many tips to help in the construction of my kits as in the article
Alan
|
Click on
images below to see larger images
|
|

|

|
|
|


