|
“THE
BULBOUS BEAUTY”
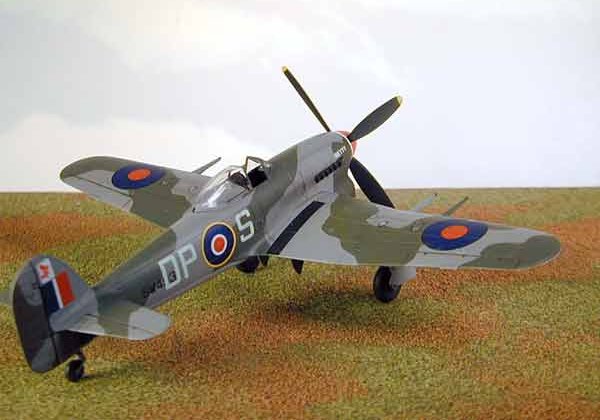
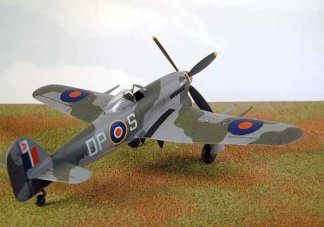
HAWKER
TYPHOON MK. IB
NO.
193 SQUADRON
ROYAL AIR FORCE
1945
Kit
Used: no. 1664
History of
the aircraft modeled:
The first
production Typhoon IA (R7082) with the 2,200 h.p. Sabre IIA engine was completed
by Gloster and flown on May 26, 1941. Production of this version, with its
twelve Browning guns, was in limited quantity, and those built were used
principally for the development of operational techniques. But the cannon-armed
Typhoon IB was following closely on the heels of the Mark IA, and the Air
Ministry was pressing for its rapid service introduction to counter the new
Focke-Wulf Fw-190. Nos. 56 and 609 Squadrons based at Duxford began to receive
their Typhoons in September 1941, before the fighter was fully developed, and
these squadrons were forced to take on part of the onus of unearthing the new
machine's numerous faults.
The decision to use the Typhoon before it was adequately developed for
operational use was ultimately justified by the results, but the price of its
premature introduction was high. In the first nine months of its service life
far more Typhoons were lost through structural or engine troubles than were lost
in combat, and between July and September 1942 it was estimated that at least
one Typhoon failed to return from each sortie owing to one or other of its
defects. Trouble was experienced in power dives--a structural failure in the
tail assembly sometimes resulted in this component parting company with the rest
of the airframe. In fact, during the Dieppe operations in August 1942, when the
first official mention of the Typhoon was made, fighters of this type bounced a
formation of Fw-190s south of Le Treport, diving out of the sun and damaging
three of the German fighters, but two of the Typhoons did not pull out of their
dive owing to structural failures in their tail assemblies.
Despite this inauspicious start to its service career and the unenviable
reputation that the Typhoon had gained, operations continued and the accident
rate declined as the engine teething troubles were eradicated, although the tail
failures took longer to solve, despite immediate strengthening and stiffening as
soon as the trouble manifested itself. In November 1942 No. 609 Squadron, led by
Wing Commander Roland Beamont, was moved to Manston in an attempt to combat the
near-daily tip-and-run raids, which were being made by Fw-190s and could rarely
be intercepted by Spitfires. The Typhoon enjoyed almost immediate success. The
first two Messerschmitt Me 210 fighter-bombers to be destroyed over the British
Isles fell to the guns of Typhoons, and during the last comparatively ambitious
daylight raid by the Luftwaffe on London, on January 20, 1943, five Fw-190s were
destroyed by Typhoons.
On November 17,
1942, Wing-Commander Beaumont had flown a Typhoon on its first night intrusion
over Occupied France and, subsequently, the fighter was employed increasingly
for offensive duties, strafing enemy airfields, ships and railway transport. The
success of the Typhoon in the ground-attack role led to trials with two 250-lb.
or two 500-lb. bombs, which were carried, on underwing racks. This load was
later increased to two l,000-lb. bombs, but the Typhoon was not to find its true
element until it was adapted to carry airborne rocket projectiles--four under
each wing. By D-Day, in June 1944, the R.A.F. had twenty-six operational
squadrons of Typhoon IBs. Without its underwing load the Typhoon IB weighed
11,300 lb.; and with two 500-lb. bombs and the necessary racks, 12,400 lb.
Maximum speed was 398 m.p.h. at 8,500 feet and 417 m.p.h. at 20,500 feet, and an
altitude of 20,000 feet could be attained in 7.6 minutes. Between the prototype
and production stages several design changes had been made. These included the
re-design of the fin and rudder, the redisposition of the wheel fairings and the
introduction of a clear-view fairing behind the cockpit. On the first few
Typhoon IAs the solid rear fairing was retained; later a transparent fairing was
fitted, but this was abandoned in favor of the first sliding " bubble
" hood to be used by an operational fighter.
The Typhoon IB, by now affectionately known as the "Tiffy",
distinguished itself particularly in the Battle of Normandy, where it decimated
a large concentration of armor ahead of Avranches, disposing of no fewer than
137 tanks, and opening the way for the liberation of France and Belgium. For use
in the tactical reconnaissance role, the Typhoon F.R.IB was developed early in
1945. In this version the two inboard cannon were removed and three F.24 cameras
were carried in their place. One Typhoon was also converted as a prototype night
fighter, with A.I. equipment, special night-flying cockpit and other
modifications. Production of the Typhoon, which was entirely the responsibility
of Gloster Aircraft, totaled 3,330 machines.
All
history referenced from the excellent Aviation History website at http://www.aviation-history.com/.
Since this was an out of the box project with the kit decals, I did not make an
in-dept research project out of it. Addition assistance in paint help on the
model came from British email IPMS buddies Len Thompson, Drewe Manton, and Steve
Barnes.
|
Click on
images below to see larger images
|
|

|
 |
|
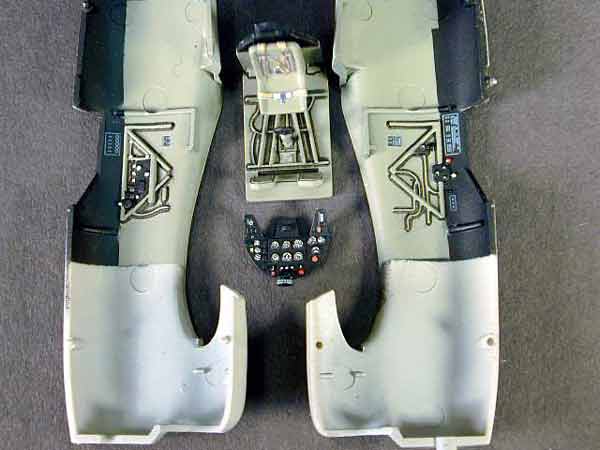
Interior:
Except for
adding some paper printed seat harnesses and a small piece of clear styrene for
the gunsight reflector, it’s done out-of-the-box. Academy has a very good
cockpit and everything fits excellent.
The cockpit was
painted Polly Scale British Interior Green-Gray with the sidewalls and head
armor plate top frame up. The instrument panel was painted black with the gauges
done using Reheat Models Instrument Gauge decals. A couple of Reheat Model’s
Control and data Placards were utilized also. The framework and such were
shadowed with a 0.005-in tech pen and black India ink.
The area in the
nose where the intercooler goes was painted Polly Scale Medium Sea Gray. The
intercooler was first painted medium sea gray, then brushed in steel and silver.
After all had dried, the screen recesses were given a black wash.
When all was
complete, I installed the cockpit and intercooler and closed the fuselage
halves. I did not like the seam line inside the bulbous intake for the
intercooler and there was no way to get to it and sand it smooth. So, I used a
piece of auto striping tape painted medium sea gray and covered the obnoxious
seam.
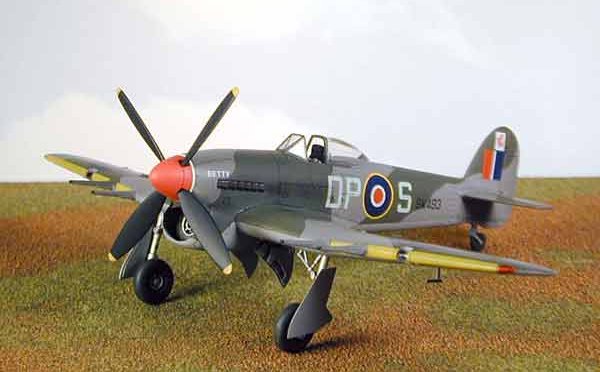
Exterior:
This was a
piece of cake! The kit had an absolutely brilliant fit, which required no fills
and very little sanding. I would have liked to have replaced the cannon barrels,
but since this was an OOB project, I simply drilled out the ends and let them
go.
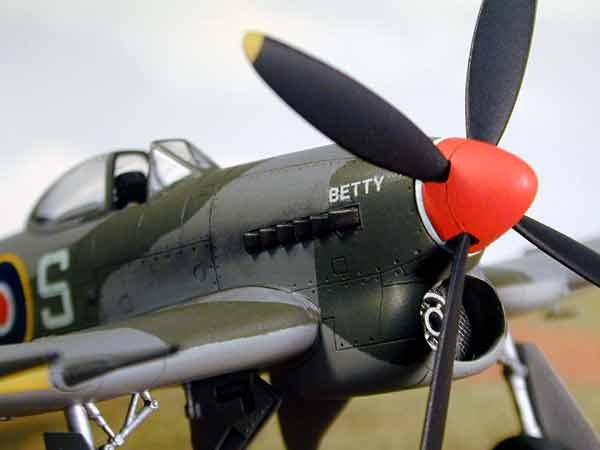
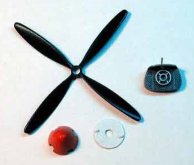
The propeller
was painted black and the tips were masked, after which they were painted
yellow. The spinner and back plate were first painted white with the spinner
itself being painted red after the white had dried.
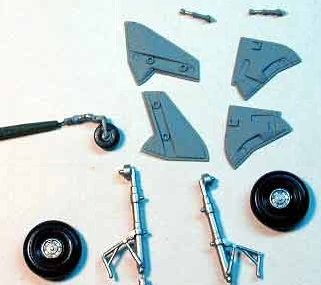
The landing
gear struts were painted Polly Scale SF Silver, as were the wheels. When dry, I
gave all a gloss clear overcoat and painted the tires Polly scale Grimy Black.
The struts were given an ink wash and a couple of Reheat Models Data Placards
were used also. The rear wheel and strut were painted Medium Sea Gray, with the
tire brushed in grimy black. All tires received a thin wash of dark earth and
all received a finish coat of clear flat and set aside for final assembly. Gear
doors were painted medium sea gray at this time also and given a black shadowing
on the interior halves. The small inner door retraction struts were painted
medium sea gray and the retraction rod brushed in bright silver.
The
landing lights were only represented by the two pieces of clear that fit into
the wings leading edge and I did not like the look at all, even after painted
the interior of the lights silver. So I simply filled the area with Krystal
Kleer and made a dimple in the glue after it had set and painted all bright
silver. Once dry, I applied a drop of Krystal Kleer for the light lens on each.
The kit’s clear covers fit superbly and only a little sanding and polishing
was required to blend them with the wing’s leading edges. These were masked
with Bare-metal foil for painting.
|
Click on
images below to see larger images
|
|
|

|

|
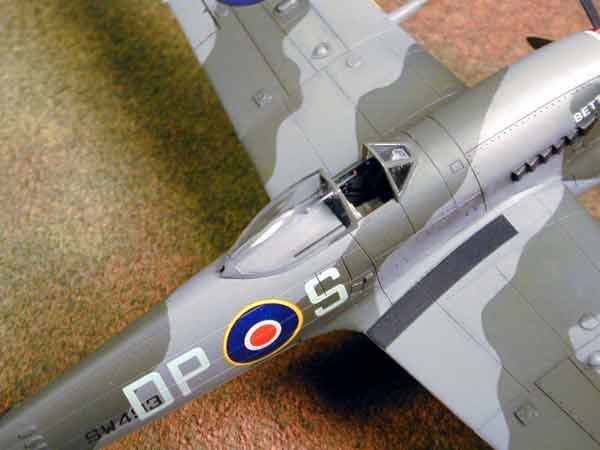
Painting
and decaling:
The canopy
windshield was attached to the model with Microscale’s Krystal Kleer after
both canopy pieces were masked using Bare-metal foil. The cockpit opening was
masked with pieces of card stock and masking tape and the rear wheel masked with
tape.
The entire
model was given two coats of medium sea gray for the undersurface and priming.
After sanding out a couple of imperfections and respraying the areas with medium
sea gray, I masked the under surfaces and gave the uppers two coats of Polly
Scale Ocean Gray. The instructions were enlarged to scale using my scanner and
the areas to remain ocean gray were cut for templates. Using the templates, I
cut the masks from very thin dentist’s sheet lead and applied them over the
areas to remain ocean gray. The lead was secured with masking tape at strategic
points. (Note: the next time you visit your dentist, ask if he has any thin lead
sheet he’s about to throw away. Chances are that he will have a big supply and
will give them to you. The stuff is great for masking as it cuts like butter
using a sharp knife and conforms to about any shape. It is also great for
replicating sheet metal and scratch-building small parts, seat belts included.).
After all
masking was applied; the uppers received two coats of Polly Scale British Dark
Green. After removing the masking it was time to paint the exhausts, which would
have been much better had Academy molded these separate as they have done with
most of their other new kits. The exhausts were first brushed in Polly Scale
Steam Power Black, followed by a brushing of Gunze Burnt Iron, and then a wash
of Pactra Rust. The exhaust openings were picked out with my tech pen and India
ink. When dry, the model was given two coats of MM Clear Gloss to prep it for
decals.
The kit’s
decals were used and whoever did these for Academy did a very good job. I had no
problems whatsoever with them, they were opaque, reasonably thin, and in
complete registry. It’s a shame Academy can’t have the same people do all of
their decals, as I have had problems with them in the past. I hope this is an
indication of the direction they are heading! The IFF stripes on the wings
leading edges were done using Microscale Yellow Trim Film. Trust me, it is much
easier than masking and painting the IFF stripes.
After the
decals had set, I gave the model a sealant coat of clear gloss and proceeded to
shadow in the recesses for the control surfaces and access panels with my tech
pen and India ink. The wing navigation lights were first painted bright silver
and this was followed by a coat of clear red on the port light and clear green
on the starboard light. The small beacon light in back of the armor plate was
brushed bright silver and given a thin drop of Krystal Kleer.
In all, this
was a delightful kit with no adverse problems. I can only highly recommend this
kit to modelers of all ages. Now I need to get its cousin, Academy’s Hawker
Tempest.
Caz
|
Click on
images below to see larger images
|
|
|

|
|
|