|
KIT:
Trumpeter 1/350 CV-8 USS Hornet
KIT
#: ?
PRICE:
$100.00
DECALS:
kit
REVIEW
& PHOTOS BY: Len Roberto
NOTES:
Gold Medal Models Photo etched Brass Set 350-21 used
HISTORY
For
an excellent history of the seventh US ship named HORNET- see the reference
section below. In short, one of three Yorktown class carriers, Hornet was
the ship that carried Doolittle’s Raiders to Tokyo in April 1942, was in the
thick of the Midway battle a few months later, and eventually met her end in
late October 1942 at the Battle of the Santa Cruz Islands.
THE
KIT
Putting
aside the recent Trumpeter aircraft issues, from a ship modeler’s perspective,
we are happy as a pig in slop that anyone is releasing 1/350 plastic ship
subjects. And to be honest, besides this model’s bow/ hull shape
distortions (apparently the hull shape is not close to accurate)- the rest of
what you get for your $100 is quite good.
This
is a big kit at just about 30 inches in length.
A massive one-piece upper hull greets you with the lower
hull as an option for non-waterline builders.
The flight deck is molded in three pieces. Detail overall is very well done with almost no flash to deal
with and a crispness that is admirable. At
first study, the kit looks well engineered. I guess the folks who work on the ships at Trumpeter are a
bit more polished than the airplane people!
Honestly,
to me Trumpeter has been a hit or miss affair—but, if you keep in mind that
the company has only been releasing kits for about 3 years- you have to be
impressed that they have reached this degree already.
Their 1/500 scale Nimitz carriers were toys and left me weary about the
Hornet. No worries as this kit is
wonderful to look at in the box and to build.
I anxiously awaited my Gold Medal Models set to be etched and when it
arrived- I was ready to go. I
wanted to do the Hornet at Midway so I purchased an extra box of SBD’s and
F4F’s. I also decided to not open
up the molded on hangar doors but a more ambitious modeler could add a lot to
the model by adding this feature. My
first child is on the way in late March so this is my last big ship hurrah until
about late summer when Trumpeter’s new Essex (an even better kit I hear) will
be next!
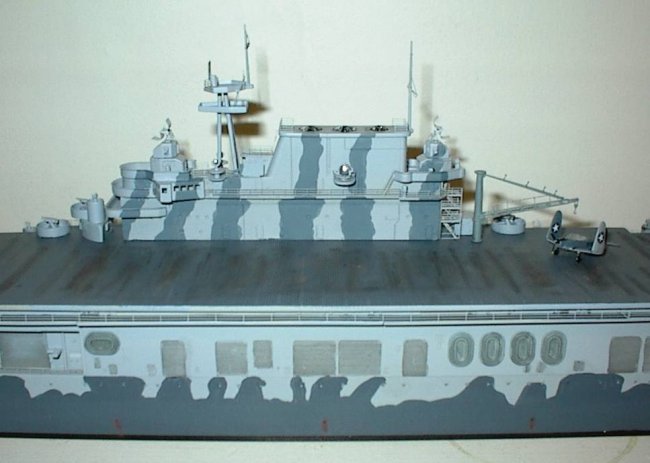
CONSTRUCTION
I
started construction with the island rather than the hull details as the
instructions illustrate. The
assembly was well designed and fit nicely.
Light sanding around corners and edges smoothed things out.
Many of the kit parts were replaced with the superb brass pieces per the
GMM instructions. These include:
-
-pri-fly
overhang on the port side of the island.
-
-SC
radar
-
-main
and aft yardarms- very nicely
done by GMM!
-
-the
rear tri-level platform with ladders- a tricky and delicate piece but worth
it
-
-and
railings on all levels as illustrated.
The
island was set aside until paint time.
It
was then on to the hull. Platforms
and sponsons were added in order as per the instructions.
I would say fit was good around the hull but would caution builders to
test fit everything! I know I am
guilty of not doing this basic step all the time.
I guess it is a habit developed by the trust I have in Tamiya kits!
While the Trumpeter instructions are laid out well, in some areas it is
best to look 2 or 3 pieces ahead and test fit how the parts will fit against
each other—if one bulkhead or sponson is off- it may cause problems later on.
The
various catwalks and gun tubs were added without trouble.
I left off all the 20mm guns until later as well as the 5 inchers. I also added railing all around the ship at this time before
painting. I am a lazy masker and
knew I would have headaches painting the deck blue by hand later on but -
that’s how I do it.
|
Click on
images below to see larger images
|
|

|
 |
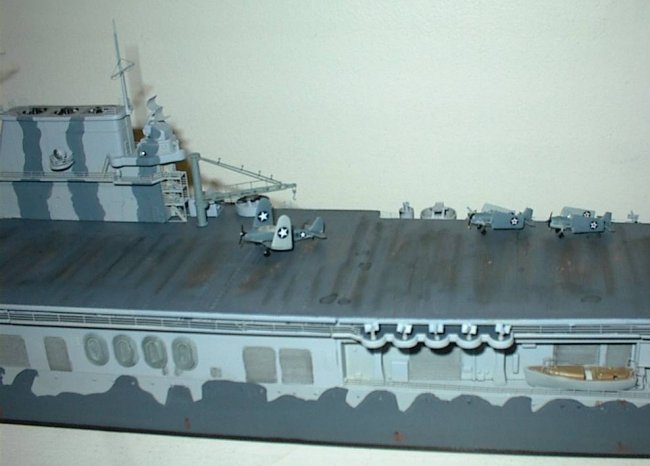
PAINTING
When
the hull was complete minus the flight deck- it was time for the base coat.
Hornet’s modified scheme did not change much during her wartime career.
Colors were a base of Ocean Grey on hull and island.
Navy Blue pattern on the hull and a Haze Grey pattern on the island.
Flight deck was a Norfolk Stain 250-N but was almost the same as Navy
Blue. Horizontal decks were deck
blue 20-B. I used the
new line of Testor’s (ex-Floquil?) Marine Acrylic paints which offer direct
matches for all the colors I needed. No
mixing! Ocean grey was thinned with
water and airbrushed on the entire hull, island and the PE fret. It
airbrushed very nicely.
After
a day of drying- it was on to the Navy Blue hull pattern.
Trumpeter provides a full color sheet with port and starboard views-
a nice touch. I thought about cutting a mask and airbrushing but decided I
would more than likely cause more damage to the hull that way.
So I laid the pattern out and brush painted the Navy Blue thinned
slightly with water. Results were
good. When dry-
I lightly sanded with the finest paper I had to smooth out some brush
strokes and to make the color uneven. Flight
deck parts were then glued on to the hull.
Fit was OK here to but I needed a lot of weight on the deck during
bonding…how do I do this without damaging the PE rails?
Well, if you have them, 20 loaded M1 Garand en-bloc clips did a fine job!
The
island stripes did not look right with Testor’s Haze Grey- it was more of a
blue-grey so I used Intermediate Blue instead.
Looks right to me.
DECK
SEAMS:
The
three deck pieces mated up pretty good. Of
course there were 2 seams to fill and I used the non-sanding method with white
putty. This uses Q-tips and nail
polish remover to smooth out the putty. I
think it works very well and this is the best tip I have learned in a while.
When dry- I touched up the seams with more Navy blue.
The Testor’s paints brush quite well too.
FINAL
CONSTRUCTION:
The
island was attached- again- check fit here.
I had to sand down a little for a good fit on one corner.
Remaining bits were added like the 5-inch mounts, whale boats, and the
tedious task of attaching PE gun shields to the 20mm singles—the GMM set also
includes sights and elevation wheels but I was fried by this point and left them
as is. These guns seem a little too
big- some tall sailors are needed to man these guns!
Touch up paint was added all around.
I
also used GMM 1/350 deck figures to populate the ship in certain areas.
DECK
WEATHERING:
I
looked at lots of color pics of WWII carrier decks to see how best to weather my
deck. Pics show a significant amount of natural wood showing up
where the stain had been worn off as well as oil stains, etc.
To replicate this, I used a dark tan color and an old brush to dry brush
across the deck mostly in the landing area portion of the deck.
I also used black/grey pastel chalk smudging across all sections of the
deck. Finally, for the oil stains I
used my trusty mix of acrylic black mixed with water and dish washing liquid to
make little puddle stains and streaks.
THE
AIRWIING:
The
aircraft took as long as the ship to build!
Each aircraft consists of 2 hull halves, both horizontal stabilizers,
wings (in some cases 4 pieces for folds), landing and tail gear, and canopies.
Then painting and decals. Each
plane took about 30 minutes to complete…
Hornet’s
airwing at the Midway battle consisted of TBD Devastators, SDB Dauntlesses, and
F4F Wildcats. I wanted
to represent each to some degree but the kit itself only comes with 2 each of
B-25’s, SBD’s, TBD’s, and F4f’s. This
causes you to buy their sets of 10 aircraft to populate your deck.
I sincerely hope Trumpeter decides to include more aircraft in the Essex
kit.
I
used the 2 TBD’s that came in the kit as well as a handful of SBD’s and
F4F’s- some with wings folded and some without in preparation for operations.
Light Grey and Intermediate Blue used for paint.
I
placed them on the deck using some pics for reference.
CONCLUSION
This
was a great build and I am proud of the way the model looks.
Looking forward to the Essex. Fit
was good but test fitting is essential. There
were no difficulties in construction so I think anyone with a few ships under
their belt could handle it. The GMM
brass set was as usual excellent. A
few brass assemblies were a little delicate so experience with PE brass is
needed before using the set. If you
can, it certainly adds a lot to the finished kit especially the aircraft cranes,
radar, railings, and boat details. If
you can get past the bow/ hull shape distortions-
this is a fine kit a promising sign of things to come from Trumpeter in
their ambitious ship release schedule.
REFERENCES
http://www.warships1.com/UScv08_Hornet_history.htm
Len
|
Click on
images below to see larger images
|
|

|

|

|
|