|
Serving with IDF/AF since 1980, the Lockheed-Martin F-16 is the Israeli
Air Force’s main workhorse. Used
for both air superiority and ground attack, IAF F-16’s have seen considerable
action. Most notorious is 1981’s Operation Opera, the attack on the
Ossirac Nuclear Facility, outside of Baghdad, Iraq. A year later in the war with Lebanon and Syria, IAF Falcons
would leave around 40 Syrian aircraft decimated over Lebanon’s Bekka Valley,
with no losses of their own. Israel
received the improved F-16C/D in July of 1987.
While A/B airframes were known as the “Netz” (hawk), the C/D
airframes were bestowed with “Barak”, Hebrew for lightning. Due to arrive in Israel in 2003, is the Block 60 F-16I Suffa
(storm). Together with the current
fleet of F-16A/B/C/D’s, the F-16I will help to replace the remaining A-4
Skyhawks and F-4 Phantoms still in service.
Getting
Started
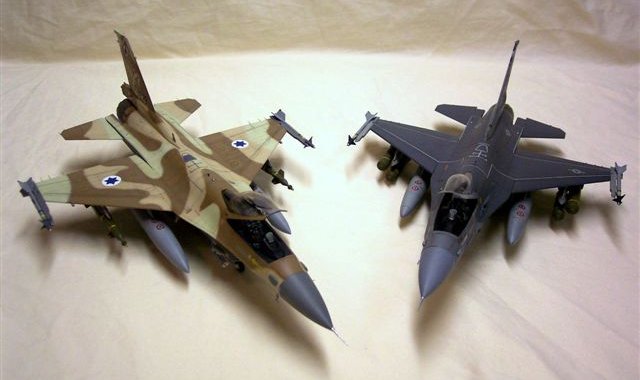
Since building the F-15I Ra’am, I’ve become a bit of an IAF
enthusiast. The skill and sheer
tenacity of IAF pilots through out the history of the Israeli Air Force is to be
both admired and respected. For my
next Israeli aircraft, I settled on the Block 40 F-16C Barak.
The items used to build this model are:
-
Hasegawa’s
1/48 F-16N Top Gun kit (no. V7).
-
Black Box
ACES II ejection seat.
-
Airwaves
resin Big-Mouth air intake and enlarged nose RHAW blisters.
-
Eagle Designs
resin ECM equipment and main gear wheels/doors
-
Hasegawa
GBU-16 laser guided bombs from their U.S. Smart Weapons set
-
Evergreen
sheet styrene and rod
-
Aero
Master’s discontinued 1/48 IAF F-16C/D decal sheet (acquired through Ebay).
Most of the procedures used to build this model are from the December
1995 issue of Fine Scale Modeler, which featured an article on how to build the
Barak from IAF historical researcher/modeler, Yoav Efrati.
It was seeing his model that inspired me to build the Barak for myself.
Construction
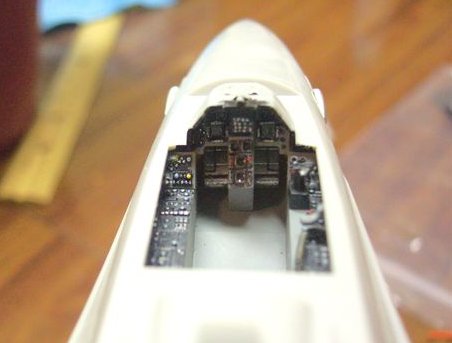
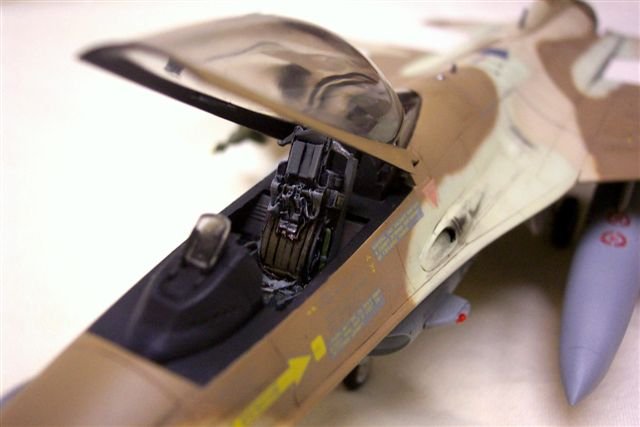
I started to install a Black Box resin F-16 cockpit set, but screwed it
up trying to add it (I suck at trying to install these things) .
The kit cockpit was used instead and detailed with guitar string (oxygen
hose) and parts from the botched Black Box set (the ejection seat was used as
well).
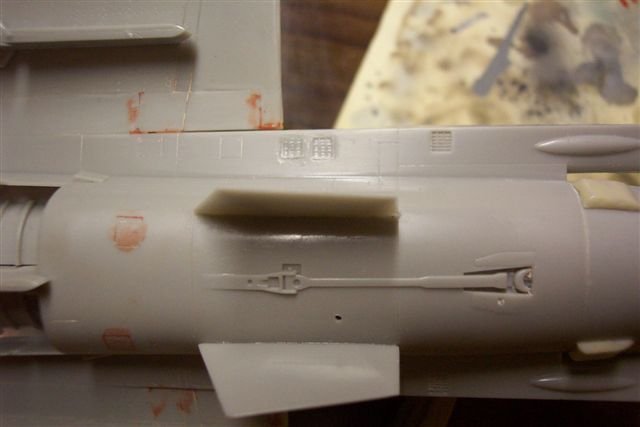
Yoav
Efrati’s FSM article served as a guide to make the tail extension/drag chute
housing. As described, the tail
extension was made from laminated sheet styrene, sanded until the profile
matched my references, and then blended into the base of the tail.
Styrene bits were used to detail the extension and the end of the chute
housing. Cut aluminum foil was used
to replicate the jagged reinforcement plate.
The tail was added after the fuselage had been assembled.
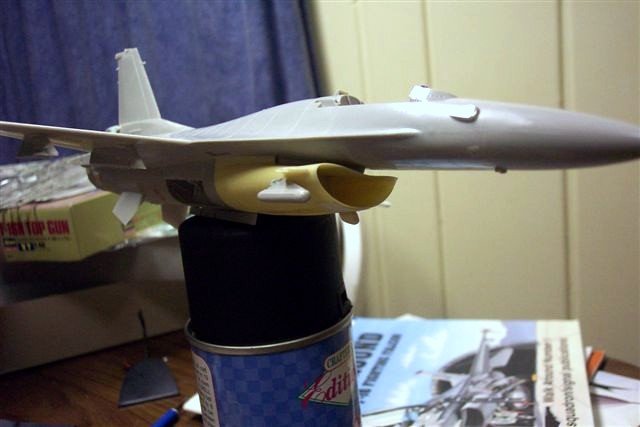
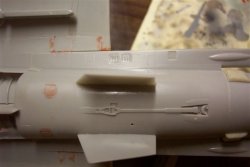
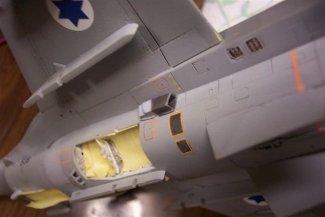
| Next up was
the integration of the Airwaves resin big mouth air intake.
All it needed was a little sanding for a better fit, and then the
intake was added to the bottom of the fuselage. Eagle Designs
Rapport III antennas were cut to accept the kit position lights then
reshaped to match reference photos. These were added to the intake along with a 005” styrene
reinforcement plate and a radar bulge from the above mentioned Eagle
Designs set. |
| Click
on image below to see larger image |
 |
|
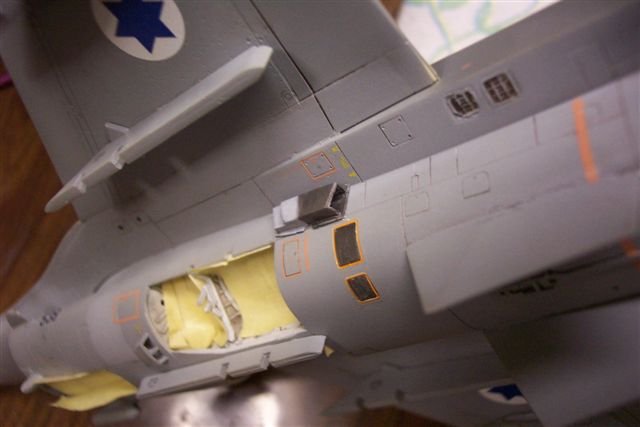
Styrene rod
was used to add the RHAW antennas to the leading edge of the wings.
The large nose blisters and radome were added next, and the extra panels
and chaff dispenser openings were scribed into the fuselage.
Next item to replicate were the extra chaff/flare dispensers found on IAF
Block 40 F-16Cs. Styrene copies of
the chaff/flare dispensers were cast from foil molds, and then added to openings
I had scribed during fuselage preparation.
|
Click on image below right
below to
see larger image |
 |
 |
In consulting
with Mr. Efrati via e-mail, he mentioned that single seat IAF F-16’s sometimes
carry a Pave Penny laser pod. Hasegawa
provides two Pave Penny pods in their Block 50 F-16 DJ kit, so I used one of
them on my Barak. The pylon was
modified by reshaping it with a sanding stick (for reference, see
Squadron/Signal’s original F-16 in action book, pg. 48), then added to the
right side of the air intake. The
head was removed and replaced with a clear seeker head from a Hellfire missile
(left over from an Apache kit), after the model had been painted and decaled.
|
Painting
and Finishing
With all the fuselage modifications and assemblies completed, it
was time to throw some paint on this bad boy.
Humbrol enamels were used for FS 33531 Sand and FS 34424 Green
(equivalent to RAF Sky “type S”), while Model Master paints were used
for FS 30219 Dark Tan and FS 36375 Light Ghost Gray.
|
| Click
on image below to see larger image |
 |
|
|
Click on images below to
see larger images |
 |
 |
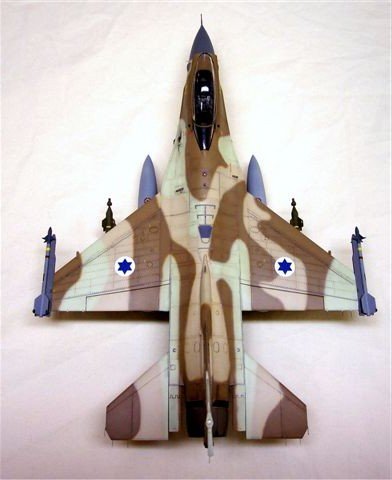
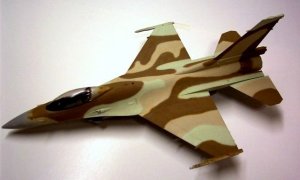
The
radome, missile rails, nose blisters, and the vertical flat sides of the
fuselage were painted Dark Gull Gray. The
camouflage was applied free hand with an Aztek airbrush, followed by what seemed
like hours of touch-up. I had
intended to do a 101 (First Fighters) Squadron F-16, so the model was painted in
the standard IAF camo pattern.
|
Click on images below to
see larger images |
 |
 |
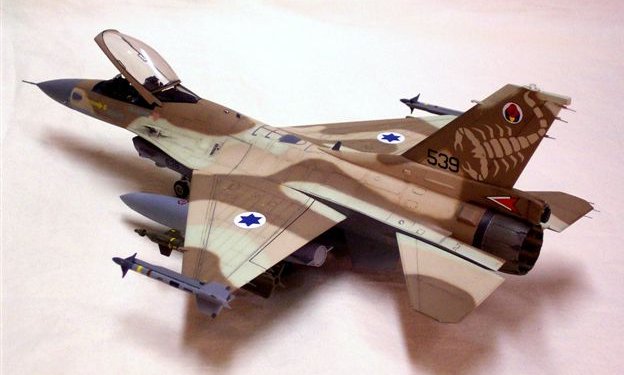
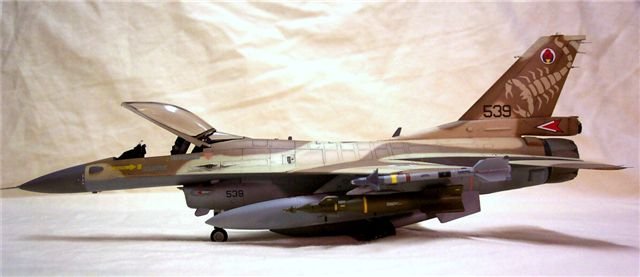
I
decided at the last minute to do a 105 (Scorpion) Squadron Barak.
More brown was applied to the tail to accommodate the large, sand color
scorpion that adorns 105 Squadron F-16’s (If the Squadron tail art
necessitates it, there is a deviation from the standard pattern applied to the
tail).
After
the paint had dried, it was time to add a couple of coats of Future.
A thinner wash of Raw Umber and Gunship Gray was flooded into the panel
lines and left to dry. After the
excess wash was removed, the model was cleaned with an alcohol wipe in
preparation for applying the decals.
The markings are from the long
out-of-production Aero Master 1/48 F-16C/D decal sheet.
I was perusing Ebay looking for some modeling stuff, when I stumbled
across this sheet. I had given up hope on trying to get these decals at an
earlier time, so suffice to say, I jumped on them when I found the auction
(Thank God for buy-it-now!). There
are several options for some really neat IAF F-16’s on this sheet, plus all
the appropriate stencils. The
markings I chose are for an F-16 serving with 105 (Scorpion) Squadron.
The scorpion decal for the tail is too big (this has been noted both in
print and on the web). As
prescribed in FSM’s Barak article, the last six segments of the scorpion’s
tail were trimmed and repositioned on the vertical stabilizer.
All the add-ons were decaled at this time as well.
After applying the decals and letting them dry, the model was cleaned
again and a few coats of Testors MM Acryl dull coat were applied.
This has become my dull coat of choice.
It dries fast and ya’ gotta love water clean up.
At
this point, I realized I had forgotten the ground starter intake (mounted above
and behind the left main-gear well). The
intake was fashioned from sheet plastic and putty, and then added to the model.
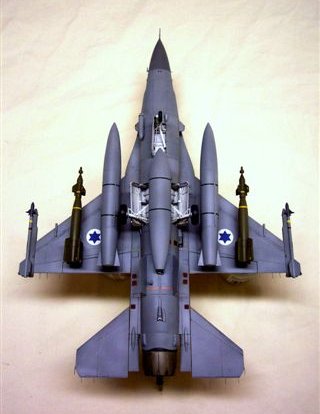
The next day, the landing gear, weapons, and fuel tanks were added.
For a load-out, I went with two GBU-16 LGB’s (from a Hasegawa weapons
set), and two AIM-9 Sidewinder missiles. The
main gear wheels and bulged doors are from the Eagle Designs set.
Most of the detail painting was completed at this time too.
The last items to add were the HUD, nose AOA probes (made from cut sewing
needles), Pitot tube and canopy. I
also added grab handles to the canopy. Stretched
sprue was used to make the static dischargers (make 15).
These were added to the trailing edge of the wings, vertical stabilizer,
and horizontal stabilators. With
that, the Barak was finished. It
now sits proudly in my display case, next to my F-15I Ra’am. Now for a vintage IAF war plane, where’s that Avia S-199
kit?...
Special Thanks to Yoav Efrati for the e-mail correspondence. The
technical information and photos he provided were an invaluable source.
Albert
Sources:
The
Israeli Air Force Website- http://www.iaf.org.il/
Building
an Israeli F-16C Barak- Yoav Efrati; Dec 1995 issue of Fine Scale Modeler;
Kalmbach Publishing
Walk
Around: F-16 Fighting Falcon- Lou Drendal; Squadron/Signal Publications
F-16
Fighting Falcon in Action- Lou Drendal; Squadron/Signal Publications
|
Click on images below to
see larger images |
 |
 |
|