|
History
- During the early 1960's the United States was sending material and
advisors to Southeast Asia to provide assistance in repelling Communist
guerilla forces in a limited conflict that was un-conventional in
comparison to the Korean conflict of just a few years before. World
War II and Korean era piston engined aircraft were employed in a new role
referred to as COIN or Counter Insurgency. These aircraft could fly
slower and loiter over a target longer than the new fast jets that were
in vogue.
One aircraft that gave a good showing and gained a
new lease on life in the COIN role during projects Mill Pond and Farm
Gate was the World War II era Douglas A-26 Invader (changed to B-26 after
the phase-out of the Martin B-26 Marauder shortly after World War II).
Unfortunately the available Invader airframes were suffering wing fatigue
caused by taxiing over uneven ground with heavy weapons hung from pylons
under the wings. After several tragic in-flight losses of Invaders to
wing failure, it was withdrawn from the conflict in 1964.
At this time a company by the name of On Mark
Engineering that had made a name for itself doing civilian executive transport
conversions of ex-military Invaders, was chosen to modify an Invader with low
airframe time to be better suited for the COIN role. Some of the mods
included strengthening the wings and fuselage to withstand low altitude
bombing attacks. Defensive armament was removed as this saved weight and
was not required for the COIN role. A larger rudder was attached to
improve single engine performance. More powerful R-2800 engines were
mounted that boosted horsepower from 2,000 to 2,500. The original
propellors were replaced by fully reversible, automatic feathering, paddle
bladed Hamilton Standard units. Fuel capacity was increased with the
addition of 165 gallon wing-tip tanks similar to those found on the T-33 and
F-80. Eight new weapons pylons built by Baldwin Locomotive were added
underneath the wings outboard of the engines. Heavy duty brakes were
installed with an anti-skid system and nose-wheel steering. The cockpit
was updated to allow for dual controls and had the latest avionics and
communication equipment installed.
| This new variant was
called the B-26K Counter Invader and surprisingly had better
performance characteristics than its original brethren in almost
all areas of the flight envelope. It was not immediately sent to the
conflict in Southeast Asia but instead received its baptism of fire with
the CIA over the Congo in Africa under the Anstalt Wigmo program between
1964 and 1967. Interestingly the CIA utilized the same Cuban Invader
pilots in the Congo that were employed in the ill-fated Bay of Pigs
invasion known as operation Pluto in 1961. |
| Click
on image below to see larger image |
 |
|
|
The Anstalt Wigmo Counter Invaders found their way
back to the U.S. by mid 1967 and soon joined other airframes that were being
sent back to Southeast Asia for operation Steel Tiger starting in 1966.
They were primarily flown in the truck busting role along the Ho Chi Minh
trail in Laos at night using the call-sign Nimrod. Based at Nakhom
Phanom Royal Thai Air Force Base in Thailand, these aircraft had to have their
designation changed to A-26A because
the Thai government would not allow the basing of bombers on their soil.
Primarily because of the arrival of
specially modified gunships, all Counter Invaders were withdrawn from
operations by 1969. A few stayed in country and were utilized for
covert operations by the CIA and at least five were turned over to the
South Vietnamese Air Force for ground instructional purposes but are not
known to have flown combat. |
| Click
on image below to see larger image |
 |
|
The model
- I utilized was the ancient Airfix 1/72 scale Invader kit along with the
Paragon Designs resin conversion set. By far not the greatest kit, but
the only game in town at the moment for a die-hard 1/72 builder that has to
have an Invader variant in their collection (Now would be a good time for some
of the Asian manufacturers to step into this arena!)... I decided to attempt
to build this nightmare and see if I could pull off a decent kit out of it.
I initially started out by sanding off all of the
raised panel lines and rivets and went about trying to correct what I perceive
as an incorrect profile to the kit provided solid 8-gun strafer nose. I
cut the nose horizontally along the thrust line of the aircraft and traced
that profile onto Plastruct and cut out four similar pieces of differing
lengths that amounted to four pieces sandwiched at the front of the nose and
only one at the back. Gap filling super glue was used to fill everything
including the incorrect holes for the .50 calibre machine guns (these would be
re-drilled later and tubing added to replicate the .50's). The nose
was then filled with BB's to keep the model resting on it's nose gear
strut.
The Airfix kit is nice in that it provides World
War II and Korean era turrets or covers, and Vietnam era flat panel turret
covers. The latter would be used to fill the turret holes and more
gap-filling super glue with it's associated sanding would take care of these
areas.
The thrust line of the port cowl was noticeably
lower at the front of the wing than the back, so I cut the rear part of
the cowl horizontally, spliced in some more Plastruct to lower the rear
thrust line to be level with the rest of the airframe, then spliced in some
more plastic to raise the upper piece with the rear of the wing. It's
not noticeable now, but would've looked really strange if left alone.
I'm hoping this problem is isolated with just this one kit. I also had
to splice a small sliver of plastic between the front of the starboard wing
and the fuselage to change the angle of the wing slightly because the
alignment of the cowl to the wing here puts the forward part of the cowl
closer to the fuselage than the port cowl. This was the only way to
fix this and again I'm hoping it's just with this one kit.
When assembling the kit engines I inserted the
propellor shaft from the back and then carefully glued a scrap piece of
plastic over them to seal them in while allowing them to still turn freely.
I would suggest that when assembling the props utilizing the resin propellor
blades, to do some careful surgery to remove the kit blades from the hub and
use the kit supplied hub parts because they will fit the shafts much better
than the resin ones that will need to be drilled out to fit.
The Paragon hubs look like they are direct copies of the Airfix hub pieces
anyhow, so there is no difference in detail. The props can be added to
the kit later once painting, decaling and other details have been added.
| The overall build with the
Paragon resin conversion parts was not too bad, but there is a lot of
filling and sanding to be done. I will caution that if you are
building a later B-26K that used the revised upper cowl intake provided in
the Paragon conversion set... the fit is HORRIBLE! I gave
thought towards trying to scratch-build these units, but somehow was able
to carefully utilize the Paragon versions. |
| Click
on image below to see larger image |
 |
|
Details
- Paragon provides a photo-etch set that includes many of the specialized
antennas associated with this variant of the Invader, but I was not happy with
them as they are flat and not very realistic. Most of the antennas on
my kit have been scratch-built using various thicknesses of metal rod and
Plastruct carved to shape.
I mentioned
earlier that the A-26K's brake system was updated by On Mark... they
utilized Boeing KC-135 wheels and brakes for the main wheels, so I set off
in search of replacements for the Airfix kit since they do not even
closely resemble any wheel pattern ever seen on an Invader. True
Details KC-135 resin wheels were perfect for the job.
|
|
Unfortunately I could not find a replacement for the nose wheel that seems
to be prevalent on so many
Invaders during the 1960's, so I ended up using the kit supplied wheel
here.
The original Airfix gear struts
are not very realistic, so I hacked them up and replaced many sections
with different lengths of metal rod for strength and to open up many of
the molded in triangles that should have hollow spaces in them. I
think I also shortened the main gear struts by a couple of millimeters to
get the kit to sit right once the wheels were attached.
|
| Click
on image below to see larger image |
 |
|
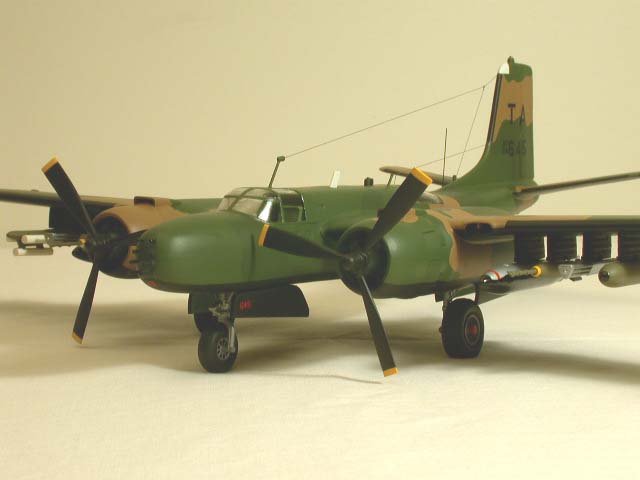
Colors & Markings
- B-26K's sent to the Congo were painted glossy green on the uppersurfaces and
a light gray on the undersurfaces. By the time they were sent to
Southeast Asia they were painted in the standard Asia Minor upper surface
3-tone camouflage scheme and had flat black undersurfaces. I used Model
Master Acryl acrylics for the upper surfaces and Tamiya flat black
acrylic for the lower surfaces. After a coat of Future floor wax, the
model was ready for what limited markings these aircraft wore.
I had always been interested in aircraft 64-17645
which had a stylized nude nose-art of Bat Girl applied to the starboard
side of the nose (not to be confused with'677 that had a black bat painted on
it's starboard nose). This aircraft had a long and distinguished career
flying in project Mill Pond as a standard B-26B, then going to the Congo
as a B-26K before going to Southeast Asia again. It was later one
of the five turned over to the South Vietnamese who presumably sabotaged the
engines when the North Vietnamese overran the country in 1975.
Supposedly the remains of these aircraft could still be seen at Nha Trang up
until at least 1986... anyone know if they're still there?
Most references I have come acoss say that for
political reasons these aircraft did not wear U.S. insignia during their time
in Thailand, but I have seen a color photo where insignia can be seen under a
thin coating of green paint on a couple of examples. I did not
choose to simulate these though since most other photos do not show this.
Decals are not widely available in 1/72 scale for
this variant of the Invader unfortunately... but since most of the markings
are in black, I took an Aeromaster 1/48 scale sheet for these aircraft and
shrunk it down to the 'proper' scale and printed it onto some
clear decal film. The Bat Girl nose-art I had to resort to hand-painting though,
but I do think it came out fairly well. The red numbers on the nose and
gear doors I used from some dry-transfer sheets I found in the
rail-road section of the local hobby shop.
For the wing de-icing boots I found some 1/8 inch
black decal stripes in the railroad section (again!) of my local hobby shop
that worked great instead of having to mask and paint these. I have
learned quick that solid color decal sheets are excellent for such
details... especially the yellow wing leading edges on British and Japanese
aircraft from World War II.
Weapons
- I wanted to replicate several of the weapons employed by Counter Invaders
during their varied missions and went with a load-out similar to that found on
the B-26K preserved at the USAF Museum in Dayton Ohio that consists of finned
napalm, Mk.82's with fuse extenders, bomblet dispensers and 2.75 inch rocket
pods. The only difference in my load-out are the flares that can be
found on the MER on the starboard wing. These were created from sections
of Plastruct tubing with their ends filled with gap-filling super glue.
Most of the weapons and the MER came from Hasegawa weapons sets, but the
bomblet dispensers came from the Hasegawa Skyraider.
|
Click on images below to
see larger images |
 |
 |
Conclusion
- Well there you have it... an Airfix kit that really doesn't look too
bad once it's completed and had a LOT of elbow grease put into it. This
was a fun project to build, but I don't think I want to build another one like
this anytime soon. Hopefully one of the Asian manufacturers will bless
us with a newly tooled version of this aircraft and its variants sometime
soon. Obviously a well known American manufacturer that seems to shy
away from 1/72 scale won't downscale their 1/48 scale kits that have already
had the research done for the molds... but I guess it will be their loss
someday as I am optimistic a new version will appear from somebody else
eventually.
If anyone has any questions about the kit I have
built here I would be more than happy to hear from you.
Jason
References:
- "Foreign Invaders," by Dan
Hagedorn & Leif Hellstrom, 1994 by Midland Publishing Limited, (ISBN
1-85780-013-3). One of the BEST references I've seen on the
Invader to date!
- "A-26 Invader In Action," by Jim
Mesko, 1993 by Squadron Signal Publications, (ISBN 0-89747-296-9).
- "Douglas A-26 Invader, Warbird Tech
Series Volume 22," by Frederick A. Johnsen, 1999 by Specialty Press,
(ISBN 1-58007-016-7).
|
|