|
The only
time I saw this aircraft was at the RAF Waddington Airshow in June 2001. I knew
then that it was one I had to model, so enough reference photos were taken to
help me out with the complicated paint scheme. Many references for this plane
(also known as the ‘Tigerjet’) can be found at the squadrons website, the
address of which is displayed on the ample fin of this Tornado.
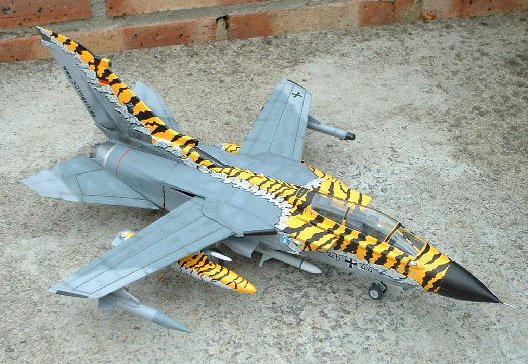
The Italeri
ECR kit was recently released here with the markings for an earlier 321sqn ‘tigerjet’,
that from Lechfeld in 1996, the same markings that Revell offer in both their
1/72 and 1/144 Tornado ECR’s. In this scale, the decal sheet is truly
magnificent with 1 sheet on A4 size containing most of the tiger stripes, and
another smaller sheet with some more stripes and a limited amount of aircraft
data. If you don’t want to face the prospect of all those stripes, then
Italeri offer a standard option from the same squadron. The painting guide is
easy to get confused by, so I would recommend marking the paint numbers clearly
before getting carried away and doing it wrong. I needed to use the paint guide
for the standard scheme on the lower half of this aircraft. I also needed to add
to it since, in reality, when I saw the plane the standard scheme was quite well
weathered.
|
Click on images below to
see larger images |
 |
 |
The kit
itself looks quite nice on opening the box – all the detail is engraved, all
the right ‘bits’ are there, and the canopy is sparklingly clear. This model
is built OOB, and immediately I discovered the lack of detail for the cockpit,
which really is sparse for this scale. I built the main parts up first: cockpit,
fin, tailerons, undercarriage and wings. With the wings however came another set
of problems. If you want the wings to move, and therefore the tanks and armament
pylons to move correspondingly, Italeri has a very hit-and-miss way of enabling
this pylon movement. You have to flatten the locating pins with a hot
screwdriver, or hot knife. OK, I tried, but failed – with the weight of the
tanks, everything wobbled too much, so the pylons are fixed! So with the wings
and all the subassemblies attached to them, painted, weathered and complete,
they were then built into the unpainted fuselage halves – not my preferred way
of model building, but the only option in this case. The general fit was not as
bad as I had been led to believe reading some reviews, but it certainly wasn’t
as good as it should be! Filler was needed on the fuselage halves, the intake
sections, speed brakes and on the small parts which attach to the wing shoulders
where they meet the fuselage – these were the wrong shape altogether!
Frustrating but by no means impossible to solve. As the model developed, it
began to look as it should.
The painting
was pretty hard to do. Lots of reference, lots of delicate, close work and all
of it hand-painted. The tigered section is glossy while the standard paint is
matt, and the decals are meant to be partly over-painted! If you are tempted to
have a go yourself, don’t forget the tiny 322sqn ‘Flying Dragon’ zapped
just beneath the port intake! Next project – 322sqns own new ‘Monsterjet’???
Who knows.
Steve
Steve
‘Cloggy’ Cladingboel,
Aircraft Special Markings SIG leader,
IPMS(UK)
|
|