Introduction
Ever since I became interested in
aviation, the P-51 has taken the trophy as my all-time favorite.
I just can’t think of another aircraft, modern or vintage, that has
such a beautiful shape and form. I’m
16 years old, and have been modeling since I was 5 or 6. (I think my first was a
Triumph TR4 car model.) I’d built
a Testors P-51D about 4-5 years ago that turned out pretty nice but it’s
gotten destroyed over the years by fiddling around and mistreatment on my part.
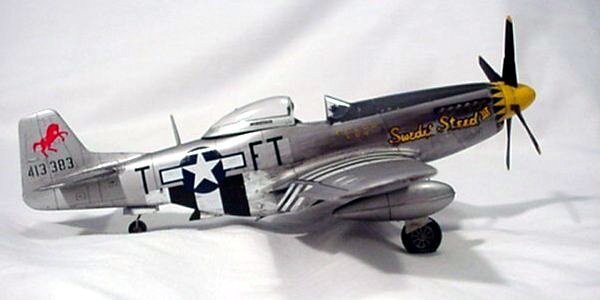
Looking to build a much more detailed P-51D in my favorite scale, 1/48, I
chose the Hasegawa over the Tamiya based on an article in Fine Scale Modeler
(May 2001 issue).
Construction
This model was the first time I was going to try aftermarket parts.
I nosed around online and got together these products to add to the
Mustang: Eduard PE set, Aires Resin Gear Well, True Details Weighted Tires,
Seats, and Fast Frames, Moskit Exhausts, Aeromaster decals, and Superscale
Invasion Stripes decals. (Sorry I forgot your names, but I’d like to thank
whoever donated the invasion stripes and spare parts.)
|
Click on images below to
see larger images |
 |
 |
I didn’t have access to a digital camera at the time, so I don’t have
any photos from the construction, but I’ll give a brief summary of it. I built the model following the Hasegawa instructions,
substituting kit parts for PE ones when the time came.
Because the Aires wheel well was designed for the Tamiya Kit, I had to do
some major sanding and modification with a motor tool to get it to fit inside
the wings. I used large guitar
string for the oxygen hose in the cockpit and added scratchbuilt details to the
gunsight. I used K&N brass
tubing to rebuild the upper sections of the main landing gear struts. I intended
to use Paragon Designs flaps but they would need a lot of modification to work,
so I cut out the kit flaps and added lengths of styrene rod to lower them.
Painting
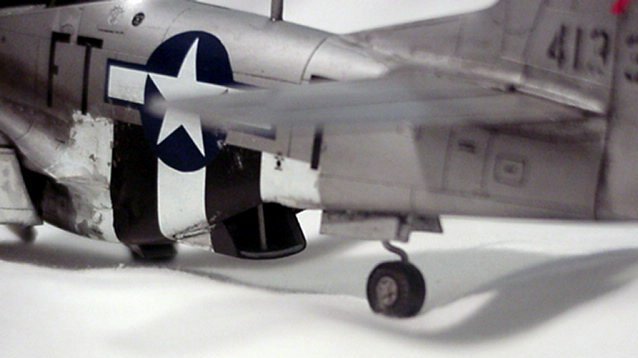
and Weathering
The aluminum finish was achieved with many coats of SNJ Spray Metal
Aluminum. I used Tamiya masking
tape to paint the black anti-glare panel. Although
the Superscale invasion stripes were supposedly made for the Hasegawa kit, the
wing decals didn’t match the kit very well, so I airbrushed Model Master Acryl
Flat White on first then cut out and applied the black stripes and touched it up
with more Acryl Flat Black. I
trimmed and applied the full decals for the fuselage stripes and touched up with
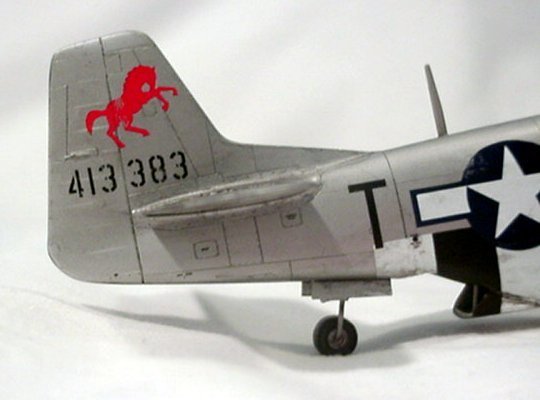
paint. The markings are a
combination of the Aeromaster decals and the Hasegawa kit decals.
Final weathering was done with an acrylic wash and chalk pastels.
The paint chipping was a combination of Testors Enamel Aluminum, Silver
colored pencil, and using masking tape to bring up areas of the paint on top of
the aluminum. I know the plane
looks extremely stressed and not taken care of properly but I find it much
easier to dirty a model up than keep it looking clean.
Sorry for any historical inaccuracies…
Conclusion
The model is technically not finished yet, I still have to add the canopy
brace and airbrush some more exhaust soot to get rid of the clear edge around
the “Swede’s Steed” decals. [p51d_exhaust.jpg Fullsize Right Aligned] I
hope to put it on a diorama base and have a pilot standing next to it in the
future, but I’d like to get started on my Tamiya 1/32 Zero, which has been
sitting under my workbench since Christmas!
John
|
|