|
In the first 3 parts
of this article I dealt with the construction and weathering of the A-6 Intruder
mode, now I turn my attention to building and painting the resin Verlinden
carrier deck base.
I saw the Verlindin 1/72 Scale All Resin Carrier Deck
Blast Shield on Verlindin's
web site and bought it (pricey at $69.00) knowing that I wanted to do a A-6E
diorama after seeing Scott Murphy's one.
| I later picked up Fujimi's 1/72nd
Carrier Deck Crew (as far as know the only 1/72nd set) at my local hobby shop to
provide the figures needed for the dio. Verlindin gives you a large piece
of Resin for the base and several small pieces for the blast shield (two plastic
rods too) and the hatch for the cat
operator's station. |
|
Also provided is the under deck copula for the cat
officers which I chose not to use and showed it in the retracted position,
because it is solid and does not have real windows and would have been a huge
pain to modify.
For some
reason Verlindin did not include the Catapult Shuttle and this needs to be
scratchbuilt, not too hard, but for $69. it would be nice to get all the parts
you need.
|
|
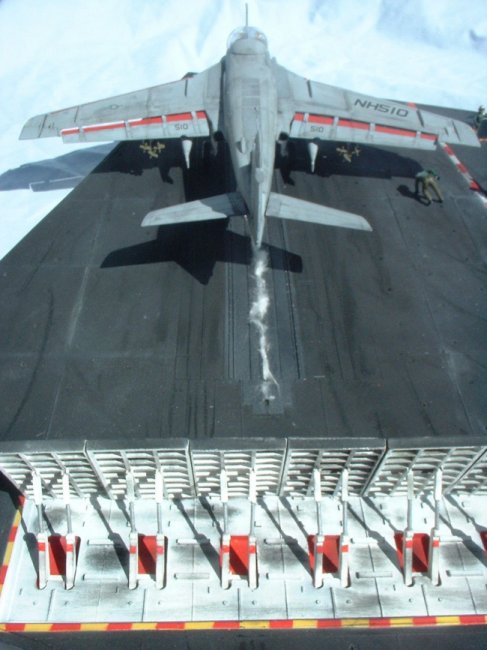
| The biggest part of building the carrier deck is painting it and
putting the blast shield together. After researching what the painting
should be (Verlindin provides no instructions or painting guide) I decided not
to paint the tie down stars white as it seems the Navy went to an all black deck
around the early 90's (I even have CNN footage of a Sunday Punchers A-6 cat shot
during the Gulf War showing an all black deck- I work in TV news and have access
to archival footage). Not only is this accurate, but it is also easier
(call me lazy, but that's a lot to mask!).
|
|
|
|
|
| Other than painting it flat
black and white in the recessed areas, there needs to be three areas painted in
safety stripes. To do this I masked the areas and painted the first color
(yellow or white) and then I laid down masking strips at even, |
| measured
intervals and then air brushed red. It seems simple, but it sure was tedious and
time consuming. Again I used Testor's Flat acrylic to seal as I moved
along, I found out early on that enamels pull off of the large resin area easily
if you don't seal them.
|
|
|
I also decided after research to paint the
catapult track with Testors "Exhaust" Metalizer, since it too gets
dirty, and sealed with Future (for shine since it's metal).
|
|
|
|
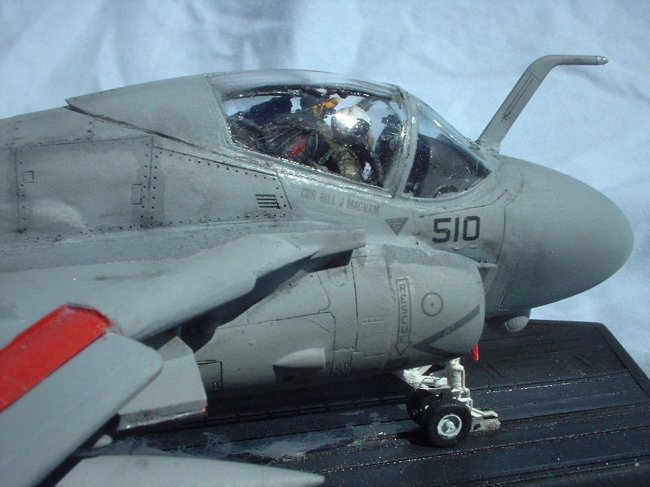
The catapult
operator's station and hatch are very nicely detailed, the only thing I added
was wiring coming out of the display panels.
|
|
|
|
A big help for me on this
project was the use of very fine markers (needle tip) that I bought at the art
store, I used them for things like drawing the rubber seals around the edge of a
hatch, and a lot of the detail in the figures (the spots on the desert camo
pants, the lettering on the backs and drawing on a mustache and the
eyebrows).
|
|
|
| The Blast shield was hard to put together because the three
separate parts for the actuators that do not fit together well. I found
the best way to do it is glue the shields together on the sides and then build
up the actuators behind them. Also be aware that you may have to sand down
the sides of the shield parts to make them fit (they are wider than needed).
|
|
Everett
(click on
the images below to load the full size photo)
 |
 |
 |
 |
|
1/72nd Fujimi A-6E
With a Verlindin Resin Catapult
set diorama Part 1
|
1/72nd Fujimi A-6E
With a Verlindin Resin Catapult
set diorama Part 2
|
1/72nd Fujimi A-6E
With a Verlindin Resin Catapult
set diorama Part 3
|
1/72nd Fujimi A-6E
With a Verlindin Resin Catapult
set diorama Part 5
|
|
|